Ever found yourself dealing with a dripping tap and wondering if you could fix it yourself? DIY plumbing skills can be incredibly empowering, saving you time and money. A common issue in household plumbing is a worn-out tap washer. These little components play a crucial role in controlling the flow of water and preventing leaks.
Benefits of replacing a tap washer:
- Cost-effective: No need for a professional plumber.
- Quick fix: Can often be done in under an hour.
- Reduces water wastage: Helps conserve water and lower your bills.
Understanding Tap Washers
What is a Tap Washer?
A tap washer is a small, often overlooked component that plays a vital role in your plumbing system. Positioned inside the tap, it acts as a seal to prevent water from leaking out when the tap is turned off. When you turn the tap handle, the washer compresses against the valve seat, creating a watertight seal.
Types of Tap Washers
Understanding the different types of washers can be quite handy:
- Rubber Washers: These are the most common and affordable type. They are flexible and create a good seal but tend to wear out faster.
- Ceramic Washers: More durable than rubber washers, ceramic washers last longer and provide a smoother operation. They are often found in modern taps.
Common Issues with Tap Washers
Worn-out washers can cause several problems:
- Dripping Taps: A common issue that not only annoys but also wastes water.
- Leaks: Persistent leaks can lead to water damage over time.
For more information on avoiding related plumbing issues like blocked drains, check out our article on Blocked Drains: What Can’t Go Down Must Come Up.
Preventing these issues by replacing worn-out washers can also help maintain good water pressure. For tips on this, see our guide on Fix Your Water Pressure.
Tools and Materials Needed for Replacement
Getting your hands dirty with some DIY plumbing? Fantastic! Let’s make sure you have everything you need to replace that tap washer without a hitch.
Essential Tools
You’ll need a few basic tools which are probably lying around in your toolbox already:
- Adjustable Wrench: This is crucial for loosening and tightening the various parts of the tap.
- Screwdriver: Depending on your tap, a flathead or Phillips screwdriver will be necessary to remove screws.
- Plumber’s Grease: Helps in lubricating the components, making reassembly smoother and preventing future leaks.
Types of Replacement Washers
Tap washers come in different materials and sizes. Here’s a quick breakdown:
- Rubber Washers: Common and affordable, but they wear out faster.
- Ceramic Washers: More durable and often found in modern taps.
Choosing the right size is essential. Bring the old washer to the hardware store or measure it accurately to avoid any mishaps.
Additional Useful Materials
A few extra items can make the job easier:
- Towels: Handy for soaking up any spills.
- Bucket: Useful for catching leftover water when you drain the tap.
Step-by-Step Guide to Replacing a Tap Washer
Step 1: Gather Tools and Materials
Before diving into any plumbing task, preparation is key. Having all the necessary tools and materials at your fingertips will save you time and prevent frustration.
Checklist of Required Items:
- Adjustable Wrench: Essential for loosening and tightening nuts and bolts.
- Screwdriver: Handy for removing screws from the tap handle.
- Plumber’s Grease: Helps lubricate parts and ensure a smooth assembly.
- Replacement Washer: Ensure you have the correct size; rubber or ceramic options are available.
- Towels and Bucket: Useful for managing spills and keeping your work area dry.
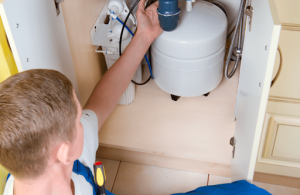
Step 2: Turn Off Water Supply
Before getting into the details of replacing a tap washer, it’s important to manage your water supply properly.
How to locate the shut-off valve:
- Typically found under the sink or near the water meter.
- If unsure, trace the pipes from your tap to find it.
- For those in Torquay and Geelong, Franklin Plumbing’s projects page offers insights on typical valve locations.
Importance of turning off the water supply:
- Prevents potential flooding and water damage.
- Essential for a smooth and dry plumbing task.
Proper preparation ensures a hassle-free experience.
Step 3: Drain the Tap
Before diving into the nitty-gritty of replacing the tap washer, properly draining any remaining water from the tap is essential. This step ensures a mess-free work environment, making the process smoother and more manageable.
Steps to properly drain any remaining water from the tap:
- Open the Tap: Turn on the tap fully to let any residual water flow out.
- Let it Run: Allow it to run until no more water comes out. This might take a few moments, but patience here avoids unnecessary spills.
- Use a Bucket: Place a bucket or bowl under the tap to catch any dripping water during disassembly.
Tips for managing excess water:
- Towels on Standby: Keep towels handy to mop up any unexpected spills.
- Plumber’s Grease Control: Apply plumber’s grease around joints if you notice minor leaks during this step.
Accidents happen, but being prepared minimises disruptions and keeps your workspace tidy. If things go awry, remember that Franklin Plumbing offers emergency plumbing services in Torquay and Geelong, ensuring you’re never left in the lurch.
Step 4: Remove the Tap Handle
Next up in our step-by-step guide to replacing a tap washer, it’s time to remove the tap handle. This step might seem a bit tricky, but with the right preparation for plumbing tasks, it’s totally doable.
1. Unscrewing the Handle
- First, look for screws that might be holding the handle in place. These can often be found under decorative caps.
- Use a screwdriver to carefully unscrew these fasteners. If you’re struggling with stuck screws, apply gentle pressure and wiggle them loose.
2. Handling Decorative Caps Safely
- Decorative caps are usually there for aesthetics and can be delicate. Pry them off gently using a flathead screwdriver or a similar tool.
- Store these components safely to avoid damaging or losing them.
Carefully removing the tap handle is crucial as it allows access to the washer without damaging other parts of your plumbing system. For more details on emergency plumbing measures, check out this guide.
Step 5: Access the Washer
Now that you’ve removed the tap handle, it’s time to access the washer. This is a crucial part of our step-by-step guide to replacing a tap washer. Let’s dive in:
- Remove Retaining Nuts or Collars:
- Use your adjustable wrench to carefully loosen and remove any retaining nuts or collars.
- These components hold the internal parts together, so proceed gently to avoid damage.
- Safety Tips When Handling Internal Parts:
- Always keep a steady hand and avoid using excessive force; internal parts can be delicate.
- It might be handy to have a small container nearby to keep all screws and nuts safe, preventing any loss.
Feel free to check out our hot water plumbing repairs page if you encounter any issues related to hot water systems while working on your plumbing tasks. The detailed guide there might come in handy for other plumbing challenges you face.
By following these steps and tips, you ensure you’re well-prepared for the next stage of this DIY project.
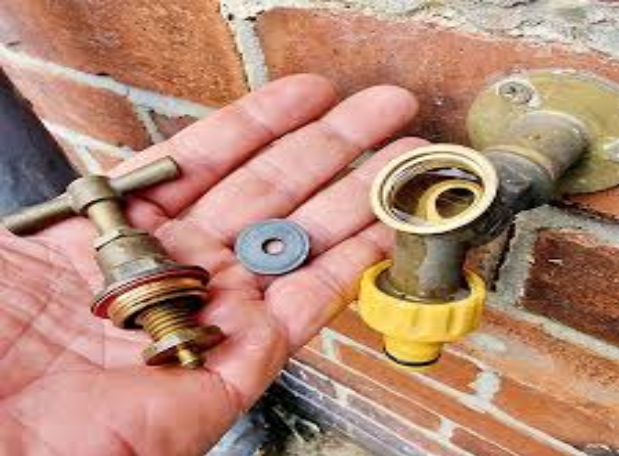
Step 6: Replace the Washer
You’re almost there! Now, let’s get that old washer out and put a fresh one in.
- Remove the Old Washer: Once you’ve accessed the washer, use a small screwdriver or pliers to carefully pry it out. It might be stuck due to wear and tear or debris build-up.
- Cleaning the Area: Before installing the new washer, clean the seat area thoroughly. Check for any leftover debris or gunk using a cloth or brush. This will ensure a snug fit for your new washer.
- Install the New Washer: Place your new washer onto the spindle, ensuring it’s sitting flat and centred. Press it down firmly so it stays in place when you reassemble the tap.
For more tips on maintaining your plumbing systems, check out our guide How to Unblock a Toilet, Geelong Plumber’s Guide and if you’re ever in a pinch, our Emergency Plumbing services are here to help.
Step 7: Reassemble the Tap
Now that you’ve replaced the washer, it’s time to put everything back together. Here’s a step-by-step guide to reassembling the tap:
- Reverse Disassembly Steps: Carefully follow the same steps you used to disassemble the tap, but in reverse order. This will ensure each component is returned to its original position.
- Secure Components: Make sure all parts, like retaining nuts and collars, are secured back in place. Be gentle but firm to avoid damaging any components.
- Avoid Over-Tightening Screws: While it’s essential to secure all parts properly, over-tightening can cause damage or make future repairs more difficult. Tighten screws just enough to hold everything securely without using excessive force.
For more detailed tips on plumbing tasks and maintenance, check out our plumbing maintenance guide.
If you have any questions or need further assistance, feel free to contact Franklin Plumbing. Our team of experts is always ready to help with your plumbing needs.
Step 8: Turn On Water Supply
Restoring water flow after replacing a tap washer is a crucial step. Here’s how to do it:
- Slowly turn on the water supply: Locate your main shut-off valve and slowly turn it back on. This prevents sudden pressure surges that could cause leaks.
- Check for leaks or issues: Once the water is flowing, inspect the tap and surrounding areas for any signs of leaks. If you spot any drips, you may need to tighten connections slightly (but not too much!).
Step 9: Test the Tap
Time to see if all your hard work paid off! Testing the tap ensures everything is functioning correctly. Follow these steps:
- Turn on the Tap: Slowly turn the tap handle to its fully open position.
- Check for Leaks: Look around the base and connections for any signs of dripping or leaks.
- Listen for Drips: Even if you don’t see water, listen closely for any dripping sounds.
- Smooth Operation: Ensure the tap turns on and off smoothly without any unusual resistance.
Signs of a successful replacement include no leaks, smooth handle operation, and a steady flow of water when turned on.
Common Mistakes to Avoid When Replacing a Tap Washer
Even the most seasoned DIY enthusiasts can stumble into common DIY plumbing pitfalls. Here are a few to keep in mind:
- Over-tightening fittings: This can lead to damaged threads or cracked parts. Aim for snug, not super tight.
- Not matching washer size properly: Ensure the new washer is an exact match to avoid leaks and poor performance.
- Forgetting to turn off the water supply: This can result in unexpected flooding and a messy clean-up.
Keep these tips in mind for a smoother fix and fewer headaches.
Conclusion
Taking on a DIY plumbing project, like replacing a tap washer, can be incredibly rewarding. Not only does it save you money, but it also gives you a handy skill that can come in use time and again. Whether you’re dealing with a dripping tap or preparing for potential future issues, knowing how to replace a tap washer is essential.
Key takeaways:
- Ensure you have all the necessary tools and materials before starting.
- Turning off the water supply is crucial to avoid any mess.
- Handle internal parts with care to prevent damage.
- Test your work thoroughly to ensure the issue is resolved.
Being proactive about home maintenance can prevent small issues from becoming big problems. If you ever feel out of your depth, don’t hesitate to reach out to professionals. Franklin Plumbing is always ready to help residents in the Torquay and Geelong areas with any plumbing needs. Happy fixing! 🚰🔧
FAQ’s
What is a tap washer and why is it important?
A tap washer is a small component that helps to seal the water flow in taps, preventing leaks and drips. Its importance lies in maintaining the efficiency of plumbing systems by ensuring that taps operate correctly without wasting water.
What tools do I need to replace a tap washer?
Essential tools for replacing a tap washer include an adjustable wrench, a screwdriver, and plumber’s grease. Additionally, having towels for spills and a bucket can be useful during the process.
How do I safely turn off the water supply before replacing a tap washer?
To safely turn off the water supply, locate the shut-off valve usually found under the sink or near the water meter. Turn the valve clockwise until it is fully closed to prevent any flooding while you work on the tap.
What are common mistakes to avoid when replacing a tap washer?
Common mistakes include over-tightening fittings which can lead to damage, not matching the washer size properly with the tap, and forgetting to turn off the water supply before starting the replacement process.
How can I test if my tap operates correctly after replacing the washer?
After reassembling your tap and turning on the water supply, test its functionality by running water through it. Look for smooth operation and check for any leaks around the handle or base, which would indicate successful replacement.
What types of tap washers are available?
There are several types of tap washers including rubber washers, which are common in many taps, and ceramic washers used in more modern fixtures. Choosing the right type depends on your specific tap model and its requirements.